All research and instructional laboratories are required to maintain a chemical inventory that includes all hazardous chemicals stored in the laboratory. Chemical inventories are maintained through the EHS Assistant (EHSA) database. PI/LS, or their designee, are responsible for review and updating inventory records.
Maintaining the chemical inventory:
- Access the EHS Assistant database and enter your MESA login and password.
- Review the inventory at the beginning of each semester and update as needed.
- Print a copy of the inventory for the Safety Records and Resources binder in your laboratory anytime inventory changes.
What Must be Included in the Chemical Inventory
Only hazardous chemicals, those possessing qualities of a physical or health hazard as defined by OSHA, are required to be included on the chemical inventory. This includes all liquids, solids, and compressed or liquefied gases.
The following items not required to be included in inventory:
- Retail products used for routine household-like activities (e.g., cleansers or dish soap; however, do include bleach used in laboratory processes)
- Materials to be expended within 1-2 days (e.g., working solutions)
- Radioactive materials* (These are recorded in RAM Inventory)
- Biohazardous materials* (These are recorded in BIO Inventory)
- Non-hazardous materials such as buffers
- Growth media
- Enzyme preparations
Accessing the Chemical Inventory System in EHSA
Principal Investigators and Laboratory Supervisors are provided with access to their chemical inventory in the EHSA database. To authorize access for additional personnel, the PI/LS must submit an email request to [email protected] with the first and last name, and G number, of the employee.
Accessing the chemical inventory in EHS Assistant
- Go to the EHSA member login
- Enter your MESA username and password
- Select the inventory icon at the bottom of the screen and they select “Quick Chemical Entry” from the table.
Issues gaining access to the application are not commonplace; however, it has been known to occur. Before contacting EHS, please be sure to check the following:
- Patriot Pass – password.gmu.edu
- Have you recently changed your password? If so, be sure to enter your new password.
- Have you never changed your password? This is an issue for users who have been with the university for a long period of time. The Patriot Pass program has only been implemented in the past few years and may not have affected all George Mason users. The chemical inventory web application, however, requires that a user have an up-to-date Patriot Pass account. Simply go to password.gmu.edu to become a Patriot Pass account holder. (NOTE: The Patriot Pass program will change your password to be the same for all George Mason applications.)
- Change in Username – Have you recently changed your username? If so, we will need to update our records on the back end to grant your access.
- Permission Granted – Has your PI submitted a request to EHS to grant your access?
It is also possible that the server on which the application resides could experience technical difficulties. If you suspect that this is the case, contact EHS as soon as possible.
Each user will only be able to enter chemical inventories for those laboratories for which they are authorized. You can view which labs are authorized for your account when adding new chemicals by referencing the “Location & Storage Information” section of the form.
If the information affiliated with your account is incorrect (i.e., missing laboratories and/or laboratories that need archiving), email [email protected] to update your information.
Entering Chemicals into Inventory
Once you have gained access to the application (https://ehsassistant.gmu.edu/ehsa) you can begin to enter chemicals into your inventory.
- Accessing the Chemical Inventory Menu

Click “Inventory.” You will then be directed to the chemical inventory main menu screen. - Adding A Chemical
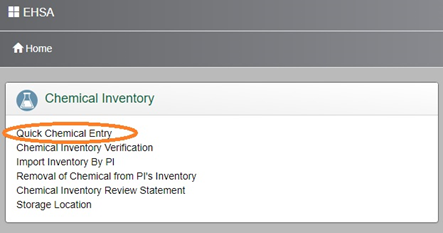
To enter a new chemical, choose “Quick Chemical Entry” from the main screen and then click “+Add”.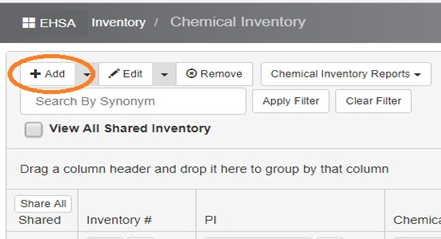
- Required Information
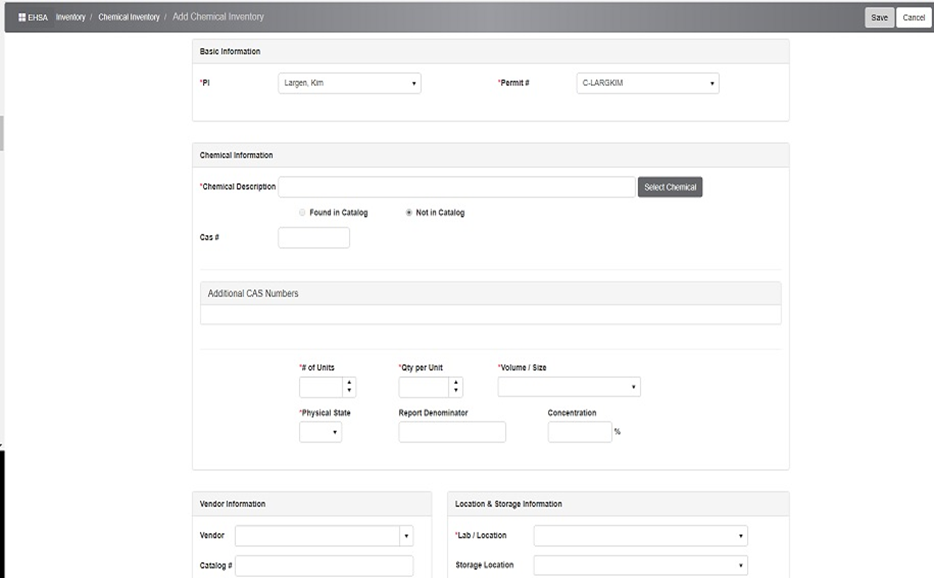
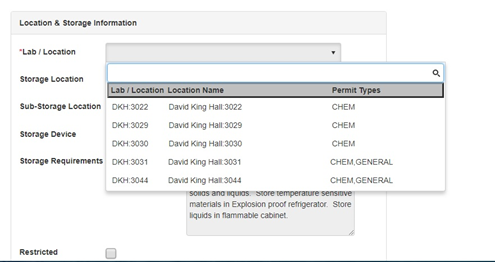
The following screen appears. Enter information for the required fields. Required fields are located in the top box and contain an asterisk (*). The following is a listing of information and the requirements for entry:- Lab: This is the laboratory where the chemical is stored. If your lab is not available please email [email protected] so that we may update our records and provide you access to this space.
- Chemical Description: The name of the Chemical to be entered into inventory. See Subsection 4: Entering Chemical Description for instructions on entering the chemical description.
- Physical State: Choose the physical state at the time of purchase of the chemical being entered.
- # of Container: Enter the number of chemical containers. If entering a number greater than 1, all chemical containers must be of equal size and from the same manufacturer.
- Quantity per Container: Enter the container size, not the amount remaining in the container.
- Units: Select the unit of measure for the container. If the unit for your particular container does not exist, email [email protected] and request to amend the unit listing.
- Receipt Date: Enter the date that the chemical was received.
- Special note: For peroxide-forming chemicals: Under Additional Chemical Information, Open Date is a required field. If no open date is entered it is assumed that the Received Date and Open Date are the same.
- Vendor: From the drop-down, choose the name of the manufacturer. If the manufacturer does not show up on the list, please email [email protected] and request to amend the selection listing.
- Storage Location: From the drop-down choose the specific storage location in the laboratory. (e.g., Flammables Cabinet, Cabinet 1). This listing is unique to your laboratory and allows for the manual entry of locations not previously utilized. To add a new location not listed in the table, simply type the location name in the field.
- Entering Chemical Description
The Select Chemical window will open over the main screen and you can enter chemicals in one of two ways: chemical description or chemical CAS number.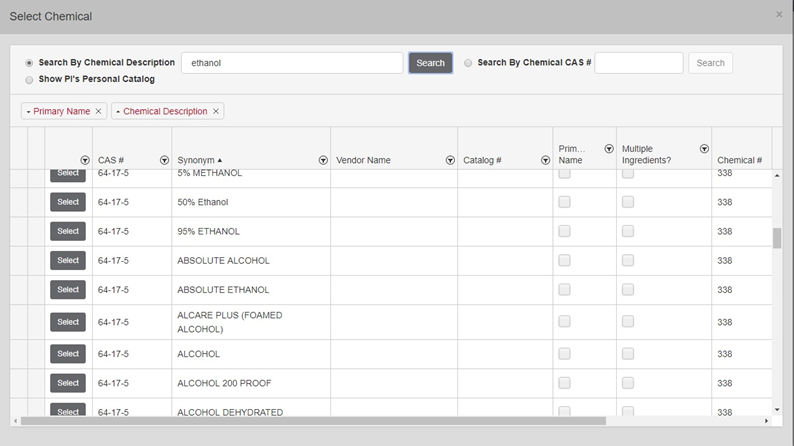
Start by searching items in the catalog. The catalog currently contains 10,000+ chemicals and/or chemical products, and it is likely that the chemical you are trying to enter already exists in the catalog.
Because chemical names may vary it is best to begin your search by using the Chemical Abstract Number (CAS#) as this is a unique identifier and is often available on the Safety Data Sheet provided by the manufacturer.
-Select the “Search by Chemical CAS #” radio button to enter the number.
If the chemical does not appear, or if there is more than one CAS# for a chemical product, then enter the name of the chemical in the “Chemical Description” field. It may take a few seconds, but a list containing the search criteria will appear.
If the chemical you want to add is not listed after searching by both the chemical CAS number and chemical description, close the “Select Chemical” window using the “x” in the upper right hand corner and choose the “Not In Catalog” option on the main screen to proceed with manual entry. The “Not in Catalog” radio button must be selected before manual entry is allowed. - Additional Chemical Information
Though not required, EHS recommends that you fill in as much as possible of the Additional Chemical Information. This information is supplemental and is not required at this time. - Saving
Once all applicable and required information has been entered, click save and the newly added chemical will now be listed in your current inventory.
Removing Chemicals From Inventory
In addition to entering received chemicals into the chemical inventory, it is important that the chemicals be removed from the inventory when they have been used, determined as waste, or transferred to another location or PI. The “remove” function can also be used in the case of a data entry error.
- Locate the chemical in your current inventory that you wish to remove, choose “Remove” in the chemical line item. Since you have entered each chemical bottle separately, be sure to remove the correct line item.

- A removal confirmation box will appear. Choose a reason for removal from the drop-down menu.
- Once the reason for removal is chosen, click “Yes” to delete the chemical. Clicking “No” will not remove the chemical and take you back to the inventory screen.
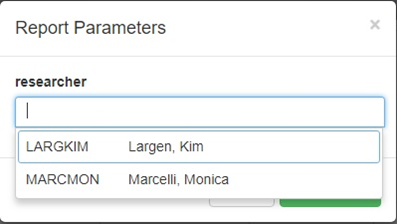
How to Print an Inventory Report
From the main inventory menu, you will find a field named “Chemical Inventory Reports” This is a drop-down listing of all the reports that are available for you to print (PDF). EHS recommends that you print the “Chemical Inventory by PI Storage Location” report and place the appropriate sections in each corresponding laboratory’s Safety Records and Resources binder.
- Click on Reports and highlight your desired report
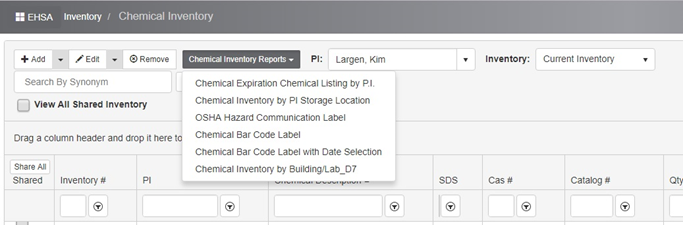
- The following screen appears. Select the appropriate researcher if there is more than one choice and click “View Report”.